Warung Bebas

Saturday 26 January 2013

Install Basic-conky in Ubuntu/Linux Mint/Debian/Fedora/Other

Install Basic-Conky in Ubuntu 12.10/12.04/Any Ubuntu Version/Linux Mint/Fedora/Others Distributions (Unity + Gnome Shell + Other Environments)

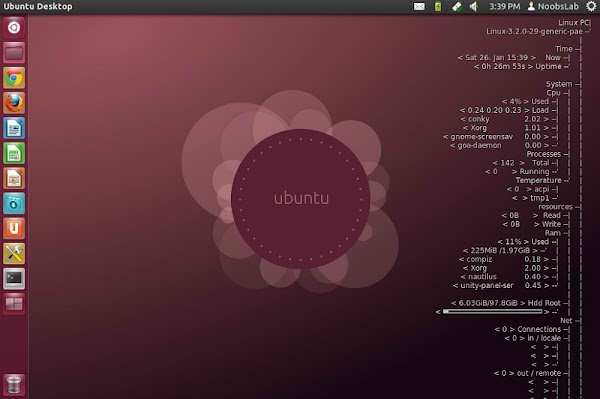
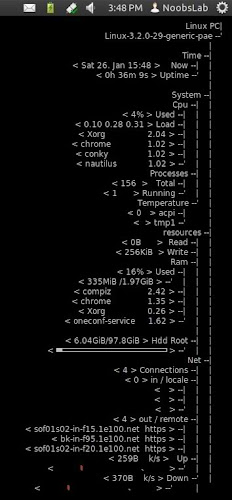
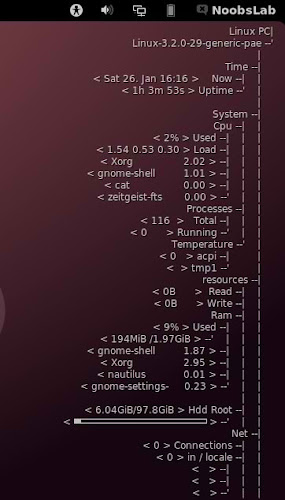
Conky is free widget for Linux, It can display any information whatever you want to show on your desktop. This conky gadget has no name, So NoobsLab just gave name Basic-conky. Basic-Conky was available for some environments but NoobsLab provides after modification for all Linux desktops like (Gnome Shell, Unity, Cinnamon, Gnome Classic, Mate, and others). Basic-conky shows CPU usage, Memory usage, HDD usage, Net Up/Down Speed and Network details, CPU up-time  Linux kernel and version, Day, Date, Time. You can check other conky widgets collection for Linux desktop to make desktop nice.
basic conky

Install Conky in Ubuntu/Linux Mint open terminal (Press Ctrl+Alt+T) and copy the following commands in the Terminal:
  • sudo apt-get install conky conky-all
Install by yourself in other distro's.

First of all Download Startup script with following commands:
  • wget -O .start-conky http://goo.gl/6RrEw
  • chmod +x .start-conky
Now open Startup Applications > click Add  > New Dialog box will open click on Browse > Now (Press Ctrl+H) see following screenshot.
conky startup

1: Basic-Conky for Ethernet
basic conky

>> For Unity, Gnome Classic, Mate, and Others
To install Basic-Conky in Ubuntu/Mint open Terminal (Press Ctrl+Alt+T) and copy the following commands in the Terminal:
  • wget -O basic-conky-eth-u.zip http://goo.gl/n0Jlg
  • unzip basic-conky-eth-u.zip
  • sudo rm basic-conky-eth-u.zip
>> For Gnome Shell, Cinnamon
To install Basic-Conky in Ubuntu/Mint open Terminal (Press Ctrl+Alt+T) and copy the following commands in the Terminal:
  • wget -O basic-conky-eth-gs.zip http://goo.gl/hOKZk
  • unzip basic-conky-eth-gs.zip
  • sudo rm basic-conky-eth-gs.zip

2: Basic-Conky for WiFi
basic conky

>> For Unity, Gnome Classic, Mate, and Others
To install Basic-Conky in Ubuntu/Mint open Terminal (Press Ctrl+Alt+T) and copy the following commands in the Terminal:
  • wget -O basic-conky-wlan-u.zip http://goo.gl/elD4z
  • unzip basic-conky-wlan-u.zip
  • sudo rm basic-conky-wlan-u.zip
>> For Gnome Shell, Cinnamon
To install Basic-Conky in Ubuntu/Mint open Terminal (Press Ctrl+Alt+T) and copy the following commands in the Terminal:
  • wget -O basic-conky-wlan-gs.zip http://goo.gl/2py72
  • unzip basic-conky-wlan-gs.zip
  • sudo rm basic-conky-wlan-gs.zip
That's it.

Friday 25 January 2013

Variety Wallpaper changer for Ubuntu 12.10/12.04/Linux Mint 14/13

Install Variety Wallpaper Changer in Ubuntu 12.10 Quantal/Ubuntu 12.04 Precise/Linux Mint 14/13

Variety is a wallpaper changer for Ubuntu which is featureful, yet slim and very easy to use. It can automatically download wallpapers from various online sources, allows rotating them on a regular interval or on demand, and provides easy to use ways to separate the great images from the junk.
variety wallpaper changer

Ubuntu wallpaper changer

Ubuntu variety

variety wallpaper changer

Changes in this Variety 0.4.12:
  • Updated tips and changes txt
  • Bugfix: Save original wallpaper name when quotes are applied
  • Bugfix: a download was forcing the thumbs window to reshow when already hidden
  • Minor fix
  • Improvements related to image preparing; Minor bug-fixes
  • Trigger a download when too few images found; Livelier thumbs when showing folders, not only history and downloads (new downloads are auto-shown)
  • Merged in variety-instant-preferences
  • Fix: removed class Window was still referred at one place
  • Replaced some unnecessary timers with calls to GObject.timeout_add
  • Reordered prefs tabs. Command-line way to set options
  • Added UI preferences tab
  • Added Rating option to main menu - optional (off by default)
  • Added funtionality to set image ratings
  • Filtering by rating added; Preparations for adding simple functionality to rate images
  • Ensure wallpaper is changed even if the current background is a solid color in Gnome/Unity

To install Variety in Ubuntu/Linux Mint open Terminal (Press Ctrl+Alt+T) and copy the following commands in the Terminal:
  • sudo add-apt-repository ppa:peterlevi/ppa
  • sudo apt-get update
  • sudo apt-get install variety
That's it
Download source for other distributions

Thursday 24 January 2013

Faience Themes and Faience/Faenza icons for Ubuntu 12.10/12.04/Linux Mint

Faience GTK + Gnome Shell Theme and Faience/Faenza Icon for Ubuntu 12.10 Quantal/Ubuntu 12.04 Precise/Linux Mint 14/13

Faience is light and cool theme for GTK and GnomeShell, Faience icon theme is based on Faenza and include GTK3, GTK2, Metacity and Gnome-Shell themes. Faience icon and theme match with each other and looks cool on desktop.
faience theme

faience theme

faience theme

faience theme

faience theme

What's new in this theme update:
  • GTK3: transitions on buttons are disabled to speed up the rendering of the theme when switching from one window to another and avoid memory leaks on some distros
  • GS: add a background on the dash launcher which make it more usable with the great 'dash to dock' extension
  • New Faience-Ocre (for Gnome-Shell) and Faience-Claire (for Unity) GTK2, GTK3 and metacity themes
  • GTK3: fixed the background colour of Nautilus canvas items when the right-click menu is displayed
  • GTK3: added animations to buttons
  • GTK3: improved the overall look of Gnome Documents
  • GTK3: removed the stripes on progressbars
  • GS: new design for modal dialogs and GDM
  • GS: updated assets to match better the GTK3 widgets
  • GTK2: removed the 1-pixel border along the vertical scrollbars for maximized windows (the problem persists with GTK3 applications).

To install Faience theme and Faience/Faenza icons in Ubuntu/Linux Mint open Terminal (Press Ctrl+Alt+T) and copy the following commands in the Terminal:
  • sudo add-apt-repository ppa:tiheum/equinox
  • sudo apt-get update
  • sudo apt-get install faience-theme
  • sudo apt-get install faience-icon-theme faenza-icon-theme
That's it
Source: tiheum

Wednesday 23 January 2013

Install Nemo File Manager in Ubuntu 12.10/12.04/13.04

Install Nemo File Manager in Ubuntu 12.10 Quantal/Ubuntu 12.04 Precise/Ubuntu 13.04 Raring

Nemo is a complete fork of Nautilus and its goal is to extend the Cinnamon user experience to desktop and file management. Nemo has features like: compact view, all desktop icons, etc.. which are missing in Nautilus 3.6 version, Open in terminal and open as root, File operation progress while copy/move files shows percentage and details, Has nice GTK bookmarks management, up/forward/back and refresh buttons, Nice proper status bar, better search, better widgets and many more.
nemo file manager
What Nemo offers:
  • Built in "Open as root" context menu item
  • Detachable tabs
  • Unified, configurable toolbar: you can add/remove the following: up icon, refresh icon, toggle button for the location bar / path bar, home icon, computer icon and search icon.
  • Option to show the full path in the titlebar and tab bars (Preferences > Display)
  • Displays an "elevated privileges" banner when running as root
  • Built in "Open in terminal" context menu item
  • Added "Set as Wallpaper" to the context menu
  • Added GTK bookmarks to the MoveTo/CopyTo context menus
  • Switch view buttons on the toolbar (Grid, List and Compact views)
  • Collapsable sidebar categories
  • Drag and drop support for the bookmarks in the sidebar
  • Sidebar: indicators under each drive, displaying the free/used space
  • Support for sending files via Thunderbird and xdg-email
  • Image properties improvements (merged from Nautilus 3.6)
  • Memory leaks fixes (merged from Nautilus 3.6)
  • and More!
nemo file manager

nemo file manager

nemo file manager

nemo file manager

To install stable Nemo File Manager in Ubuntu 12.10/12.04/13.04 open Terminal (Press Ctrl+Alt+T) and copy the following commands in the Terminal:
  • sudo add-apt-repository ppa:gwendal-lebihan-dev/cinnamon-stable
  • sudo apt-get update
  • sudo apt-get install nemo
To install Nightly Builds of Nemo File Manager in Ubuntu 12.10/12.04/13.04 open Terminal (Press Ctrl+Alt+T) and copy the following commands in the Terminal:
  • sudo add-apt-repository ppa:gwendal-lebihan-dev/cinnamon-nightly
  • sudo apt-get update
  • sudo apt-get install nemo
Install Extra plugins for Nemo File Manager, First add PPA from above then install:
  • sudo apt-get install nemo-compare nemo-dropbox nemo-fileroller nemo-pastebin nemo-seahorse nemo-share
That's it

Install Ubuntu Phone Clock in 0.5 Ubuntu 12.10/12.04/Linux Mint 14/13

Install Ubuntu Phone Clock in 0.5 Ubuntu 12.10 Quantal/Ubuntu 12.04 Precise/Linux Mint 14/13

Ubuntu OS is getting popular day by day and almost all Linux users(Power-User) is waiting for Ubuntu OS to run on their phones. Ubuntu Phone OS has really nice clock on screen which changes color and animation on phone OS. So now Gabriel Barbosa Nascimento made this clock for Ubuntu desktop OS. It looks really fancy & cool and it has classic feature to animate clock and change color after sometime automatically. Also there are clock colors available to choose which is relevant to your wallpaper/theme. It is possible to drag this widget anywhere on your desktop. This has been tested in Ubuntu 12.10/12.04, If you want to try on other Ubuntu or Ubuntu based versions then Go ahead.
ubuntu phone clock

ubuntu os clock

ubuntu clock

To install in Ubuntu 12.10/Linux Mint 14 open Terminal (Press Ctrl+Alt+T) and copy the following commands in the Terminal:
  • sudo add-apt-repository ppa:barbosanascimentogabriel/ubuntu-phone-clock
  • sudo apt-get update
  • sudo apt-get install ubuntu-phone-clock
To install in Ubuntu 12.04/Linux Mint 13/Other Ubuntu versions open Terminal (Press Ctrl+Alt+T) and copy the following commands in the Terminal:
  • wget -O ubuntu-phone-clock.deb http://goo.gl/6b5Cs
  • sudo dpkg -i ubuntu-phone-clock.deb && rm ubuntu-phone-clock.deb
That's it

Sunday 20 January 2013

Install Ubuntu Server Manager Utility in Ubuntu/Linux Mint

Install Ubuntu Server Manager utility in Ubuntu 13.04 Raring/Ubuntu 12.10 Quantal/Ubuntu 12.04 Precise/11.10 Oneiric/11.04/10.10/10.04/Linux Mint

Ubuntu Server Manager is a Graphical-User-Interface to install and manage (Apache 2, MySQL, Proftpd, Samba, Monitorix, SSH, Nagios, Webmin) and to monitor the server log activity.
There are several other options for services like: Net activity viewer, Update dynamic IP, Putty for ssh, Open Ports to see server open connections, Logs, Clear logs option, Localhost scan using Nmap, Perform scan of IP/Domain name using Nmap, RKhunter to check if system is effected with rootkit, Firewall configuration option, Open apache www default folder as root, Webalizer to generate report of site.
This utility only manage local machine.

To install services Go to Help & Install > About & Install Servers 
ubuntu server manager

Installation and removal of services
ubuntu server

To install Ubuntu-Server-Manager in Ubuntu/Linux Mint open Terminal (Press Ctrl+Alt+T) and copy the following commands in the Terminal:
  • wget -O usm.deb http://goo.gl/QECjX
  • sudo dpkg -i usm.deb && sudo rm usm.deb
That's it

Thursday 17 January 2013

Install PS2 Emulator in Ubuntu 12.10/12.04/Linux Mint 14/13

Install PS2 Emulator in Ubuntu 12.10 Quantal/Ubuntu 12.04 Precise/Linux Mint 14/13

PCSX2 is a PlayStation 2 emulator for Windows and Linux. It was started by the team behind PCSX (an emulator for the original PlayStation) back in 2002, and as of early 2012 development is still active. The emulator achieved playable speeds only by mid-2007 and subsequent versions have improved speed and compatibility making it both the ultimate solution for PS2 emulation and the instrument to keep and preserve the PS2 legacy in the modern world. Though not yet perfect the program can successfully emulate most commercial PS2 games at playable speeds and good visuals (often better than the original PS2). There are few number of games which can be played with PCSX2 Emulator.

Ubuntu playstation emulator

Ubuntu playstation2 emulator
Current PCSX2 notable features:
  • Recompilers for Emotion Engine (EE), Vector Unit 0 (VU0) and Vector Unit 1 (VU1). They are used to translate some parts of the original PS2 machine code into x86 machine code, speeding up emulation. Due to the fact that PS2 machine code is an entirely different language from x86 machine code these re-compilers are probably the most complicated parts in PCSX2.
  • Dual core support allows PCSX2 to use up to 2 CPU cores speeding up the emulator significantly.
  • Proper SPU2 emulation helps reproduce PS2 audio or even enhanced audio on the PC which is not a trivial task considering the lack of documentation and the fact that it has to synchronize with many other emulated processors.
  • Full game-pad support makes it possible to emulate every Dual Shock 2 feature.
  • Patch system to create cheats easily. It can also be used to skip code where emulation is still broken (which ultimately can make the game playable). This feature is quite user-friendly and easy to use.
  • Additional optimizations (hacks) to speed up emulation. You will be able to play certain games on lower-end machines thanks to this feature.
  • Fully working memcard support.
  • Fully working IPU support responsible for FMV - video cut-scenes should mostly run correctly.

If game is working very slow then Go to Config -> Emulation -> Check the Preset and move preset setting to most right (see the picture)
ps2 emulator

Game-pad Setting
playstation2 emulator

More setting can be found in menus
pcsx2

Note: The video plugin set by default doesn't work properly for some cards, May be you can face many graphic glitches appears, you must have to use ZZ Ogl PG CG  0.3.0 [libzzogl-cg-0.3.0] instead and OnePAD 1.1.0 for the game-pad.

First Download Bios for PCSX2, Enter following commands in Terminal:
  • sudo apt-get install p7zip p7zip-full
  • wget -O bios.7z http://goo.gl/ZcLjd
  • mkdir ~/.config/pcsx2
  • 7z x bios.7z -o.config/pcsx2/bios && rm bios.7z
Just use default location for Bios files.

To install PCSX2 in Ubuntu 12.10 Quantal/Linux Mint 14 open Terminal (Press Ctrl+Alt+T) and copy the following commands in the Terminal:
  • sudo add-apt-repository ppa:noobslab/pcsx2
  • sudo apt-get update
  • sudo apt-get install pcsx2
To install PCSX2 in Ubuntu 12.04 Precise/Linux Mint 13 open Terminal (Press Ctrl+Alt+T) and copy the following commands in the Terminal:
  • sudo add-apt-repository ppa:micove/console
  • sudo apt-get update
  • sudo apt-get install pcsx2
That's it
Thanks to Linko for Notification
 

Just the Life of Eddie Copyright © 2012 Best Celebrity Wallpaper -- Powered by Blogger